Wednesday, May 22, 2024

ADF Bundle Patches - Log4j and DB Connection Speed

 ADF Bundle Patches - Log4j and DB Connection Speed 

Patches List:


Log4j:

1st Patch:

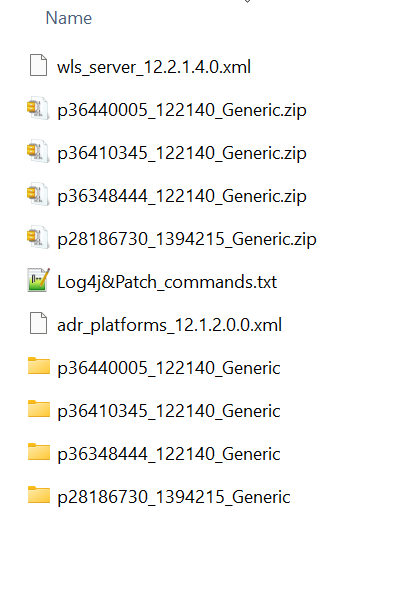
Patch Number: 28186730

Description: Opatch Upgrade


commands:

 1)cd C:\Program Files\Java\jdk-1.8\bin

 2)set oracle_home=C:\Oracle\Middleware12214\Oracle_Home

 3)java -jar C:\Patch_Files\Log4j\p28186730_1394215_Generic\6880880\opatch_generic.jar -silent oracle_home=C:\Oracle\Middleware12214\Oracle_Home


2nd Patch:

Patch Number:36348444

Description: Latest Bundle Patch for Jdeveloper

command: C:\Oracle\Middleware12214\Oracle_Home\OPatch\opatch apply C:\Patch_Files\Log4j\p36348444_122140_Generic\36348444


3rd Patch:

Patch Number:36440005

Description: Log4j 

command: C:\Oracle\Middleware12214\Oracle_Home\OPatch\opatch apply C:\Patch_Files\Log4j\p36440005_122140_Generic\36440005


4th Patch:

Patch Number: 36410345

Description:  Jdeveloper Start/ Co-herance Patch 

command: C:\Oracle\Middleware12214\Oracle_Home\OPatch\opatch apply C:\Patch_Files\Log4j\p36410345_122140_Generic\1221421


After apply all the Patches Jdeveloper Clean:

#jdev clean:

=============

cd /

cd C:\Oracle\Middleware12214\Oracle_Home\jdeveloper\jdev\bin

jdev -clean


Note:

1.While applying patches please close Jdeveloper, Java  

2.Open Command prompt in Admin mode

3.While applying any patches missing some files, have uploaded in Share Point location. 

C:\Oracle\Middleware12214\Oracle_Home\inventory\featuresets

Tuesday, March 26, 2024

ADF – Groovy for Total Sum of a Column in a Table

 ADF – Groovy for Total Sum of a Column in a Table

We will be looking in this article as how we can add Total of a column in a table. Very often we require to have total of a column in a table. For example , we might need total sum of Salary column in the table.
We will be leveraging power of Groovy in accomplishing this task.
So lets see how we can do this.
Use Case :- Add a Total Salary Attribute below Salary column in Employees Table.
Model Project
Considering that we have EmployeesView VO object which is based on Employees EO, go to attributes of VO and click add new attribute. Select “Add new Attribute”. It will by default be transient. Give this attribute  name as TotalSal.
Now go to View Accessors tab and click on green + sign to create new View Accessor.
Select EmployeesView from the first window and shuttle it so that you can see like below.
Do ok and it should be like below screenshot.
Now go to attributes tab and select the new transient attribute (TotalSal).
Give its Default value as Expression and give Groovy expression as EmployeesView1.sum(“Salary”) .
View Project
Create a new page. Drag and Drop EmployeesVO from data control and create a new read only table “without” TotalSal Attribute.
Now go to Salary Column in Structure and do a right click and select footer from facet as shown below.
Now from EmployeesView1 in DataControl, drag and drop TotalSal column in this new footer facet.
Now go to bindings and create a new binding for this variable.
 And change the value of footer output text with this binding.
Save all and run this page.
Hope this was useful.

Sunday, March 24, 2024

How to specify min/max date value for an inputDate component.

 Very often in projects, you get a requirement to restrict an user from selecting a date value before today's date and sometimes restrict an user from selecting a date value beyond today's date. In this blog post, I will explain you with simple steps how to achieve this feature using min and max values of an inputDate component.


1. minValue attribute: the minimum value allowed for a date value.
You can use this attribute to disable past dates before today's date by following below steps.

Step1: Drag and drop an inputDate component on a page.

Step2:  Define a managed bean variable minDate and override the getter of this variable as mentioned below. Here we are setting the minDate date variable to current date.

    public Date getMinDate() {
        try {
            Calendar cal = Calendar.getInstance();
            java.util.Date date = cal.getTime();
            DateFormat formatter = new SimpleDateFormat("yyyy-MM-dd");
            String currentDate = formatter.format(date);
            maxDate = formatter.parse(currentDate);
            return formatter.parse(currentDate);
        } catch (Exception e) {
            e.printStackTrace();
        }
        return null;
    }
Step3: Go to inputDate component and set the minValue attribute to the managed bean variable created in step 2.

                <af:inputDate label="Min Value" id="id1"
                            value=""
                            minValue="#{pageFlowScope.TestBean.minDate}"
                            autoSubmit="true">
                </af:inputDate>

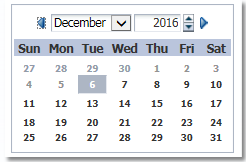
Run the page and see that all the past dates before today's date(6th Dec, 2016) are disabled.  

2. maxValue attribute: the maximum value allowed for a date value.
You can use this attribute to disable future dates after today's date by following below steps.

Step1: Drag and drop an inputDate component on a page.

Step2:  Define a managed bean variable maxDate and override the getter of this variable as mentioned below. Here we are setting the maxDate date variable to current date.

    public Date getMaxDate() {
        try {
            Calendar cal = Calendar.getInstance();
            java.util.Date date = cal.getTime();
            DateFormat formatter = new SimpleDateFormat("yyyy-MM-dd");
            String currentDate = formatter.format(date);
            maxDate = formatter.parse(currentDate);
            return formatter.parse(currentDate);
        } catch (Exception e) {
            e.printStackTrace();
        }
        return null;
    }
Step3: Go to inputDate component and set the maxValue attribute to the managed bean variable created in step 2.

                <af:inputDate label="Min Value" id="id1"
                            value=""
                            maxValue="#{pageFlowScope.TestBean.maxDate}"
                            autoSubmit="true">
                </af:inputDate>

Run the page and see that all the future dates after today's date(6th Dec, 2016) are disabled.  

Tuesday, November 7, 2023

programmatically-select-all-values-in ADF Faces multiSelect component (af:selectManyCheckbox, af:selectManyChoice, af:selectManyListbox, af:selectManyShuttle)


Programmatically populate values in ADF Faces multiSelect component (af:selectManyCheckbox, af:selectManyChoice, af:selectManyListbox, af:selectManyShuttle)


Hello All,
Previously i have posted a lot about component that supports multiple selection in ADF Faces (af:selectManyCheckbox, af:selectManyChoice, af:selectManyListbox, af:selectManyShuttle)
- Multiple Selection in ADF Faces

This post is about selecting all values in a component programmatically on a event like button click, value change event etc.
Note that this post is designed for ADF BC (viewObject) based components , to set values in bean based component check this-
Programmatically populate values in ADF Faces multiSelect component (af:selectManyCheckbox, af:selectManyChoice, af:selectManyListbox, af:selectManyShuttle)


So for this i have just dropped Departments viewObject as multiSelect component on page
(af:selectManyCheckbox, af:selectManyChoice, af:selectManyListbox, af:selectManyShuttle)


 Page bindings section looks like this-


Now see code of Set all values as selected button-


    /**Method to get BindingContainer of current viewPort (page)
     * @return
     */
    public BindingContainer getBindings() {
        return BindingContext.getCurrent().getCurrentBindingsEntry();
    }


    /**Method to set all values as selected in SelectMany Components.
     * @param actionEvent
     */
    public void setAllValuesToSelected(ActionEvent actionEvent) {

        int arrIndex[];
        //Get the iterator binding of component
        DCIteratorBinding deptIter = (DCIteratorBinding) getBindings().get("DepartmentsView1Iterator");
        //Get viewObject from Iterator
        ViewObject deptVo = deptIter.getViewObject();
        //Get component list binding , component is directly based on this
        JUCtrlListBinding list = (JUCtrlListBinding) getBindings().get("DepartmentsView1");
        DCIteratorBinding iterList = list.getDCIteratorBinding();
        RowSetIterator rsi = deptVo.createRowSetIterator(null);
        int i = 0;
        int rowCount = (int) deptVo.getEstimatedRowCount();
        //Initialize array and set it's size (equal to number of rows in List)
        arrIndex = new int[rowCount];
        while (rsi.hasNext()) {
            //Get viewObject next row from RowSetIterator
            Row nextRow = rsi.next();
            //Set this row as page iterator's current row
            iterList.setCurrentRowWithKey(nextRow.getKey().toStringFormat(true));
            //Now get index of this row
            int indx = iterList.getCurrentRowIndexInRange();
            //Add it to array
            arrIndex[i] = indx;
            i++;
        }
        rsi.closeRowSetIterator();
        // Set as selected indices
        list.setSelectedIndices(arrIndex);
    }


All done, now run and check application , click on button and see what happens ?


Great, it's working :)
I have explained one more approach to set values in multi select component that makes use of component binding
check it - Set values in af:selectManyChoice programmatically - Oracle ADF

Sample ADF Application-Download

Set values in af:selectManyChoice programmatically - Oracle ADF

 This post is about a very common question

How to set selected values in af:selectManyChoice component ?
Sometimes we need to set some values in selectManyChoice component on some action

In this post i am using Departments table of HR Schema to create selectManyChoice (Multiple Selection)
Just drag and drop Departments viewObject as ADF Select Many Choice
see- Using Multiple Selection (selectManyListbox & selectManyCheckbox component) in ADF


(Jdev Version- 12.1.3)
dropped a button on page and on this button action ,  setting values in component
See this simple managed bean code -


import java.util.ArrayList;

import javax.faces.event.ActionEvent;

import oracle.adf.view.rich.component.rich.input.RichSelectManyChoice;
import oracle.adf.view.rich.context.AdfFacesContext;

public class SetValueSmcBean {
    private RichSelectManyChoice selectMcBind;

    public SetValueSmcBean() {
    }

    /**Methos to set selected values in SelectManyChoice
     * @param actionEvent
     */
    public void setSelectedValuesAction(ActionEvent actionEvent) {
        ArrayList listVal = new ArrayList(20);
        //Add DepartmentId to list that you want to set as selected
        listVal.add(101);
        listVal.add(102);
        // Set this List as value using component binding
        selectMcBind.setValue(listVal.toArray());
        //Refresh Component on page (partial target)
        AdfFacesContext.getCurrentInstance().addPartialTarget(selectMcBind);
    }

    public void setSelectMcBind(RichSelectManyChoice selectMcBind) {
        this.selectMcBind = selectMcBind;
    }

    public RichSelectManyChoice getSelectMcBind() {
        return selectMcBind;
    }
}

run application and check-

Downoad Sample Application
Thanks , Happy Learning :)

Tuesday, September 12, 2023

Oracle ADF Deployment in Oracle Fusion Cloud - Sandbox


#Important Link

https://denuwanhimangahettiarachchi.medium.com/authenticate-non-fusion-application-via-the-oracle-fusion-cloud-a58ae3153172


Tuesday, May 5, 2020

Set current row programmatically for af:table programmatically from managead bean using POJO

Set POJO table current row 

One of the ways to set current row is 

//Table binding
private RichTable tableBinding;


 RowKeySet rowKeySet = tableBinding.getSelectedRowKeys();

 rowKeySet.clear();
 //Add row index in rowKeySet.add();
 //rowKeySet.add();
 SelectionEvent selectEvent = new SelectionEvent(tableBinding.getSelectedRowKeys(), rowKeySet, tableBinding);
selectEvent.queue();

A  POJO based table is created and setting the current row when we add a item.

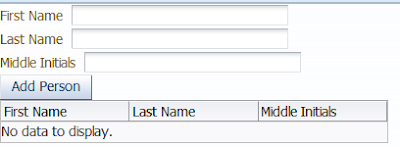
1.Person Object is created with first name , last name and middle initials


2. Create a managed bean for af:table, this managed bean uses Person Object to add data to table ,A List with person is used to add data. I have declared first name, last name and middle initials to bind to input value .


3.Drag and drop af:table from component palette ,keep necessary columns and in Value attribute of table bind with List<Person> and change column output text values .


4. Add a button , bind input text values with bean first name, last name and middle initials references . Add action listener for button in bean.


5. In action listener we will add the values from first name, last name and middle initials to personList and set current programmatically. 


Run the application 


As current row is set for the last added person added , that person detail row is highlighted here