ADF Lifecycle
ADF Cycle is and extended version of JSF Lifecycle. For each request from client to server, application invokes ADF Page lifecycle.
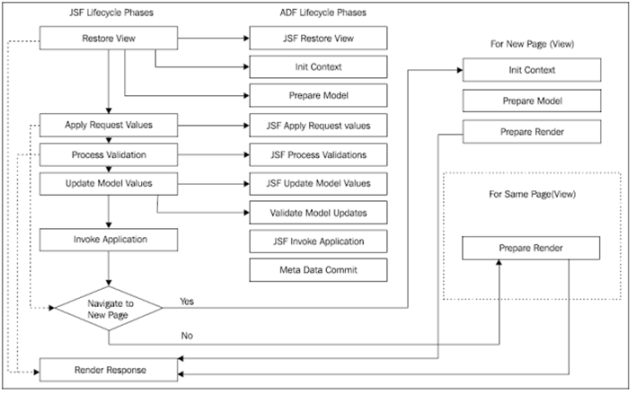
Below are the phases of ADF Page Life Cycle. Please follow step by step flow.
1)
Restore View: The component tree for the page will be restored. page URL will be passed to bindingContext object which will find its page definition file.
Init Context: BindingContainer object will be initialized (which is runtime representation for pageDefinition file).
Prepare Model: Methods in Executables section will be executed whose refresh property set to: ‘Prepare Model’.
And also Input parameters will be applied/evaluated.
2)
Apply Request Values: Input values will be stored to temporary location and initialized.
Apply Request Values: Input values will be stored to temporary location and initialized.
3)
Process Validation: The input values will be converted to underlying data types [e.g.: string to date] and validations will be applied.
Process Validation: The input values will be converted to underlying data types [e.g.: string to date] and validations will be applied.
4)
Update Model values: The local values (temp) will be discarded and updated in the Model.
Validate Model updates: updated model values will be validated. (Validation happens on updated values at EO level)
Update Model values: The local values (temp) will be discarded and updated in the Model.
Validate Model updates: updated model values will be validated. (Validation happens on updated values at EO level)
5)
Invoke Application: Action bindings will be executed in this phase.
Commit Metadata: Changes to the runtime metadata will be committed. Also here in this phase runtime changes will be stored using MDS (Meta Data Service)
Invoke Application: Action bindings will be executed in this phase.
Commit Metadata: Changes to the runtime metadata will be committed. Also here in this phase runtime changes will be stored using MDS (Meta Data Service)
6)
Prepare Render/ Render Model: Binding Container will be refreshed (So that it allows for any changes that may have occurred in the Apply Request Values or Validation phases).
Render Response: Finally the page will be appeared with updated values.
Prepare Render/ Render Model: Binding Container will be refreshed (So that it allows for any changes that may have occurred in the Apply Request Values or Validation phases).
Render Response: Finally the page will be appeared with updated values.
(If the page is navigating to another page then in this step the phases will be ‘Init context’, ‘Prepare Model’, ‘Prepare Render’ ‘Render Response’)
Refresh Condition: For Executables like Iterators, methods if the default ‘Refresh’ condition is ‘Deferred’ which means only the required will executed at ‘Render Response’ phase which have UI Dependency.
If you set Refresh property forcefully to ‘Prepare Model’ or ‘PrepareRender’ then always that method will be executed during that phase. (irrespective of UI dependency)
If you set Refresh property forcefully to ‘Prepare Model’ or ‘PrepareRender’ then always that method will be executed during that phase. (irrespective of UI dependency)
First time page load: When the page is loaded for the first time, it’ll go through first phase which is ‘Restore View’, in this phase the view state of the current page will be checked and as the page is loaded for the first time, there won’t be any view state. If there is no view state, then it skips next phases and directly enters ‘Render Response’ state, as it is not required to validate/update anything. From the next subsequent requests from this page, it’ll go thought first phase ‘restore view’ where the current view state will be compared with the previous view state, and if there is a difference between view states then it’ll go though all the phases. Otherwise it’ll again directly enters Render Response phase.
Immediate:
On Command Button: [If you set for Command button it skips validations]
- When Immediate=”true” property is set for a command button, it means that the action/action listener for that button will be executed immediately. (generally if you won’t set, then all the input fields and other component values present in the page will be validated and updated through multiple phase of Life cycle).
- So by keeping the Immediate property value to ‘true’ then action/actionListener will be invoked during second phase (Apply request values) and it skips all other phases (3,4,5) and only ‘Restore view’, ‘Apply Request Values’, ‘Render Response’ phases will be invoked.
- A general real time example would be setting ‘Immediate’ property to true for ‘Cancel’ button for a form. As when cancel is invoked actually we won’t bother about validation of entered input values.
On Input Component:
- If you set the Immediate property to Input field component, then what happens? One line answer would be the local format conversion and validation will happen during second phase ‘Apply Request Values’ instead in the third phase ‘Process Validation’ to make the values available for button’s action/actionListener methods whose Immediate property is true [those methods executed during second phase when Immediate is true for buttons, and values of input fields will not available by then in this phase if immediate for input fields is not set to True].
- Let’s take InputA whose autoSubmit property is not set to ‘true’, CommandBtnB whose Immediate property is set to ‘true’. Enter some value into InputA and click on CommandBtnB then as Immediate property is set action Listener will be invoked during second phase ‘Apply Request Values’ and it skips the next steps process validation, Modal Updates, Invoke Application. Suppose if you want to get the value of InputA in the actionListener, it will not be available by then as InputA value will be converted& validated in the Third phases ‘Process Vlidation’ which is getting skipped because of Immediate property on ComandBtnB. When you give ‘Immediate’ property to true for InputA, then that component value is converted and validated during the second phase ‘Apply Request Values’. So the entered value of InputA will be available in the actionListener method when Immediate property for InputA is set to ‘true’.
- This property is Available to both Command Button and Input field components.
Auto Submit:
- When AutoSubmit=”true” property is set for an input text field, then only that component will go through the Life Cycle event when curser is removed/ tab out from that input text field. Though other fields have values entered and which are not valid, it won’t throw any error.
- So when this property is set for a field, that filed value will be submitted, validated and updated in the Model and finally component will be refreshed.
- If you set the partialTriggers property for other components pointing to this command component whose AutoSubmit is true then those properties will also under go validation and re render phases.
- E.g.1 : InputA whose autoSubmit is ‘true’ & InputB which has required validation as ‘true’. Now on entering value to InputA and tab out, will not give any validation error on InputB though the value of InputB is null.
- E.g.2 : InputA whose autoSubmit is ‘true’ & InputB which has required validation as ‘true’ & partialTriggers property point to InputA comp Id. Now on entering value to InputA and tab out, will give validation error on InputB.
- This property is Available only for Input components to get validated and post their data to model. This property is NOT available to command button component.
ValueChangeListener:
- If you want to call a method and execute some java code when the value of a filed is changed, then you just need to set the ‘ValueChangeListener’ property’s value for that field to required method.
- ValueChangeListener event is triggered during the 3rd phase of ADF Life cycle (Process Validations phase)
Partial Submit: [To avoid full page refresh]
- If you set PartialSubmit property to a command button in form then entire form will be submitted. All the fields will under go validations. And entire page will NOT be refreshed.
- If don’t set this property value to ‘true’ then entire page will be refreshed. Instead by setting this property we can avoid refresh of the page. If you want to refresh any component then you can do it by using partialTriggers property.
- This property is Available to only Command Button. And is NOT Available to Input field components as similar property to it, autoSubmit is available to them.
PartialSubmit vs AutoSubmit:
- PartialSubmit property will be given to command buttons. Which generally used to submit the form and to avoid full page refresh after that.
- AutoSubmit property will be given to Input component which will validate, model update & re render that component on tab out from that component. It doesn’t care about other components.
- Now similarity is If you set these properties to respective components [PartialSubmit to command button, auto submit to Input text], then these will refresh the other components which uses partialTriggers property pointing these component Ids.
- So you can also call autoSubmit for input component as partial submit as it does the same functionality.