Wednesday, August 28, 2019

How to programmatically navigate in ADF?

Sometimes we might need to programmatically execute the navigation and redirect to another page in Oracle ADF. This can be done in two ways


Approach #1

Get the navigation handler handle from the application context and pass the appropriate arguments to that. A sample code to achieve the same is as below.

import javax.faces.context.FacesContext;
import javax.faces.application.Application;
import javax.faces.application.NavigationHandler;

public void handleNavigation() {
    FacesContext context = FacesContext.getCurrentInstance();
    Application app = context.getApplication();
    NavigationHandler handler = app.getNavigationHandler();
    handler.handleNavigation(context, null, "navigation-action");
}

If you see the signature of the handleNavigation method, it is as below
public abstract void handleNavigation(FacesContext context,
                                      String fromAction,
                                      String outcome)

Approach #2
  1. Have a command button with action set on it.
  2. Make the visible property of the button false. 
  3. Programmatically execute the action of the button to navigate to the required page. In this way we hide the button and achieve the navigation. The sample code for the same is as below

import javax.faces.context.FacesContext;
import javax.faces.component.UIViewRoot;
import javax.faces.event.ActionEvent;
import oracle.adf.view.rich.component.rich.nav.RichCommandButton;

public void handleNavigation() {
  FacesContext facesContext = FacesContext.getCurrentInstance();
  UIViewRoot root = facesContext.getViewRoot();
  RichCommandButton button = (RichCommandButton) root.findComponent("button-id");
  ActionEvent actionEvent = new ActionEvent(button);
  actionEvent.queue();
}

selectManyShuttle with prepolulated list : ADF

This post talks about how to use af:selectManyShuttle component. Not only how to use it, but to display already selected set of values as pre populated list out of complete list.


So shuttle component has two tags which are of importance. 

<af:selectManyShuttle value = "selected values" has value attribute which refers to selected values and inside this tag there is <f:selectItems  value="all values". This selectItems tag refers to complete set of list.


Lets go ahead and implement the selectManyShuttle component with prepopulated list.

This app can be downloaded from here ShuttleExample.zip .

I created a simple ADF application in JDev. Created a jspx page in ViewController project named shuttleTest.jspx


Now as said in the beginning, we need to set value attribute of af:selectManyShuttle for selected list of values and value attribute of f:selectItems for complete list. So we create a backing bean named ShuttleValues with two ArrayList attributes. selectedValues and allValues.


Now we need to implement getSelectedValues and getAllValues method. Below is their implementation.


So the main point to remember here is that All values are instance of javax.faces.model.SelectItem and selected values are just values in list which are part of all values.

Now we need to assign these two methods getAllValues and getSelected values to the value attribute of af:selectManyShuttle and f:selectItems. Below it is done.


Now lets run the page and test our shuttle component.


See the value1, value2 and value3 are in selected list on the right hand side. This is what we coded in getSelectedValues method.


So in the getSelectedValues and getAllValues we can get the values from the DB table and show them in the shuttle component. I used hard coded values in this example for demo purpose and to keep it simple.

Tuesday, August 27, 2019

Drag and Drop feature in ADF table-Reorder single rows values in a table

IF you wanted to have an ADF page with functionality of drag and drop it is important that you must understand the basic concept of drag and drop in java then only you will be able to customize your adf page as per your requirements. In this exercise we will try to learn more about features provided by Java for drag and drop and later we will use the same to customize our ADF applications.


Oracle has provided an excellent document on the same

http://docs.oracle.com/javase/tutorial/uiswing/dnd/intro.html

With this feature in mind lets create a project to move data from one table to another using drag and drop feature.

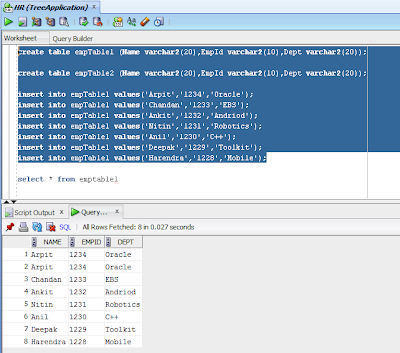
Lets create two table and insert some record in to one of the table.

create table empTable1 (Name varchar2(20),EmpId varchar2(10),Dept varchar2(20));

create table empTable2 (Name varchar2(20),EmpId varchar2(10),Dept varchar2(20));

insert into empTable1 values('Arpit','1234','Oracle');
insert into empTable1 values('Chandan','1233','EBS');
insert into empTable1 values('Ankit','1232','Andriod');
insert into empTable1 values('Nitin','1231','Robotics');
insert into empTable1 values('Anil','1230','C++');
insert into empTable1 values('Deepak','1229','Toolkit');
insert into empTable1 values('Harendra','1228','Mobile');


In this exercise we will just try to reorder the rows by just dragging and dropping the rows. So we will use one table for this purpose.

Later we will use the same exercise and extend it to drop the rows in different table.

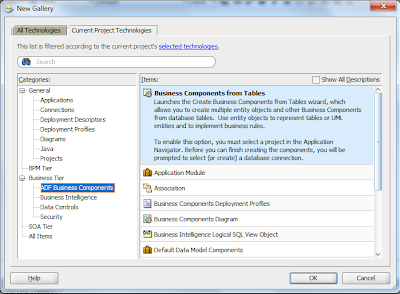
Create a Business component from table


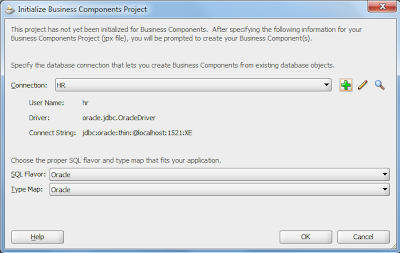
Connect to schema where you have created your tables


Select your tables


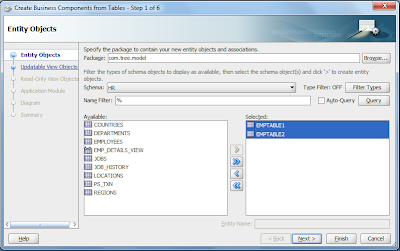
Create EO and VO and finish your wizard.

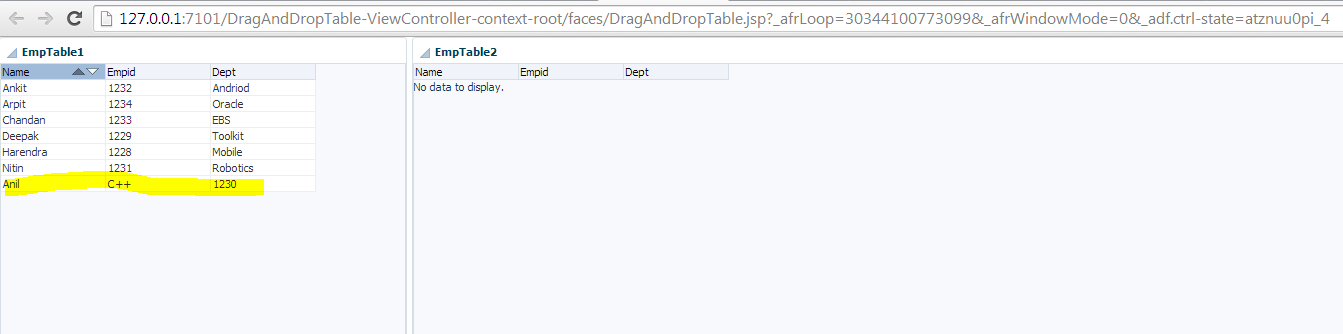
Now create a jsf page and drag and drop the two table in to the page so that your page should appear like this.


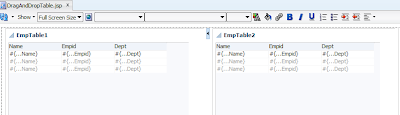
We are adding both the tables however in this exercise we will use only the first table where we have the data.

We will try to drag and drop the rows from the first table itself and while dropping in to the table we will change the column values.

Once the page is created search for a DragSource and drag and drop it into the first table.

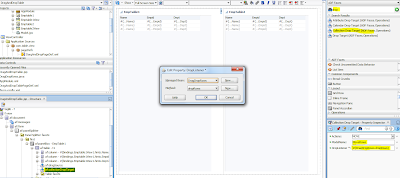
ONce it is dropped you can go to property inspector to define the action that has to be perfomred.

Select action as MOVE and specify a meaningful value to Discriminant

The discriminant property allows the user to cor-relate a drag event with corresponding drop target so that in case of multiple drag and drop the user do not get confused.

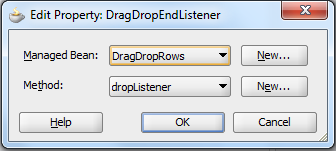
Finally select the DragDropEndListener and create a Bean and a method for drag source listener


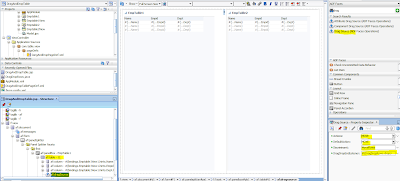
Search for Drop now in the component pallete.

Drag and drop Collection Drop target(as we are dragging rows) and drop it to the same table as shown.

Ensure the model name matches the discriminant that you have specified in the Dragsource

Click on the DropListener and create new method for the dropListener in the same bean you have created earlier.

Save all the changes.


Now everything is java. We want that as soon as the dragged row is dropped the select rows gets deleted from the source node . This can be implemented using the following code

public void dropListener(DropEvent dropEvent) {
// Add event code here...
DCBindingContainer bc =
(DCBindingContainer)BindingContext.getCurrent().getCurrentBindingsEntry();
DCIteratorBinding dcib =
bc.findIteratorBinding("Emptable1View1Iterator");
RowSetIterator iter = dcib.getRowSetIterator();
iter.removeCurrentRow();
}

Reference

Once we are able to delete the source row we have selected we can now simultaneously go to the drop target listener.

For drop target listener we have the following code

public DnDAction dropRows(DropEvent dropEvent) {
// Add event code here...

RichTable rt = (RichTable)dropEvent.getDragComponent();
Transferable t = dropEvent.getTransferable();
DataFlavor df =
DataFlavor.getDataFlavor(RowKeySet.class, "MoveRows");
RowKeySet rowKeySet = t.getData(df);
List key = (List)rowKeySet.iterator().next();
rt.setRowKey(key);
JUCtrlHierNodeBinding rowBinding =(JUCtrlHierNodeBinding)rt.getRowData();
Row row = (Row)rowBinding.getRow();
//addRow(row);
DCBindingContainer bc =
(DCBindingContainer)BindingContext.getCurrent().getCurrentBindingsEntry();
DCIteratorBinding dc =
bc.findIteratorBinding("Emptable1View1Iterator");
RowSetIterator iter = dc.getRowSetIterator();
Row newRow = iter.createRow();
newRow.setAttribute("Name", row.getAttribute("Name"));
newRow.setAttribute("Empid", row.getAttribute("Dept"));
newRow.setAttribute("Dept", row.getAttribute("Empid"));
iter.insertRowAtRangeIndex(iter.getRowCount(), newRow);
return DnDAction.MOVE;
}


It get the data from the dragged source and then as you can see it create a new rows and you can notice one thing in the code

newRow.setAttribute("Name", row.getAttribute("Name"));
newRow.setAttribute("Empid", row.getAttribute("Dept"));
newRow.setAttribute("Dept", row.getAttribute("Empid"));

The new node thus created will have Dept value in Empid column and vice versa.

Lets deploy the code and test it from the console.you will get a page like this


Now try dragging and droppin any rows in the table.
I dragged the first field and droppped it in the same table and i got the following result.


As you can obvserver the row which i have dragged and dropped the value for empid and dept are interchanged. This is what we were trying to achieve in this exercise.The current code is working fine only for one row.

Probably not a great example but it must have given you a basic idea as how drag and drop of table works. We will now extend the same sample and try to achieve different functionalities in the same such as dragging and dropping multiple rows, moving data from one table to another.

Thursday, August 22, 2019

SessionScope Variable set in ViewObject, ViewCriteria Expression in ADF

Set the Value:
-----------------
operatingUnitId = "3400";
ADFContext.getCurrent().getSessionScope().put("OU", operatingUnitId);

Get the Value in ViewObject:
-----------------------------------
adf.context.sessionScope.OU


Source Code:
------------
<Variable
    Name="bing_orgId"
    Kind="viewcriteria"
    Type="oracle.jbo.domain.Number">
    <TransientExpression
      Name="VariableScript"><![CDATA[adf.context.sessionScope.OU]]></TransientExpression>
    <Properties>
      <SchemaBasedProperties>
        <DISPLAYHINT
          Value="Hide"/>
        <LABEL
          ResId="com.herb.scm.model.evo.PoRequisitionHeadersAllEOVO.bing_orgId_LABEL"/>
      </SchemaBasedProperties>
    </Properties>
  </Variable>

Wednesday, August 21, 2019

Hide the 'Add Fields' button in query panel Advance mode

This below blog we will see how to hide the ‘Add Fields’ button in the advanced mode. This below window is the query panel.


Now we need to click ‘Advance’ button. The below window is the advance mode of query panel.

                                 
Now we will see how to hide ‘Add Fields’ button in advance mode query panel using ADF skin.First we need to create an ADF skin in source folder. For this, add a new ADF skin and follow the below configuration.


Open the source tab in the skin file. Now we need to add the below custom class for hiding the ‘Add Fields’ button.

/**ADFFaces_Skin_File / DO NOT REMOVE**/
@namespace af "http://xmlns.oracle.com/adf/faces/rich";
@namespace dvt "http://xmlns.oracle.com/dss/adf/faces";
.AFQueryHideAddFields af|query::footer-facet-content-style
{
  display: none;
}

Now we need to add the custom class “AFQueryHideAddFields” in af:query component. The code is below

<af:query id="qryId1" headerText="Search" disclosed="true" 
      value="#{bindings.EmployeesVOCriteriaQuery.queryDescriptor}"
      model="#{bindings.EmployeesVOCriteriaQuery.queryModel}"                                      queryListener="#{bindings.EmployeesVOCriteriaQuery.processQuery}"                    queryOperationListener="#{bindings.EmployeesVOCriteriaQuery.processQueryOperation}"
resultComponentId="::resId1"         binding="#{backingBeanScope.backing_QueryPanel.qryId1}"
        styleClass="AFQueryHideAddFields"/>

<af:query id="qryId1" headerText=" " disclosed="true"
                  value="#{bindings.PoRequisitionHeadersAllEOVOCriteriaQuery.queryDescriptor}"
                  model="#{bindings.PoRequisitionHeadersAllEOVOCriteriaQuery.queryModel}"
                  queryListener="#{bindings.PoRequisitionHeadersAllEOVOCriteriaQuery.processQuery}"
                  queryOperationListener="#{bindings.PoRequisitionHeadersAllEOVOCriteriaQuery.processQueryOperation}"

                  saveQueryMode="hidden" rows="3" maxColumns="2" modeChangeVisible="false"/>

Now you run your page and check the ‘Add Fields’ button will not display in advance mode of query panel.

Thanks...